برد راه انداز GPS NEO-6M
zoom_out_map
chevron_left chevron_right

برد راه انداز GPS NEO-6M

3011001039

موقعیت یاب جهانی (GPS) با ولتاژ ورودی 3 تا 5 ولت و قابلیت ارتباط مستقیم با آردوینو 

0‎ریال (با مالیات) 0‎ریال (بدون مالیات)
اتمام موجودی

Description

This module is compatible with APM2 and APM2.5, and the EEPROM can store all of your configuration data. Interface: RS232 TTL Power: 3-5v Baud rate Default: 9600bps No battery (this is not safe for airmail) Battery model is MS621FE, requires soldering You can download the test program directly from the ublox website (u-center version 6.31 download (requires Internet connection installation)).

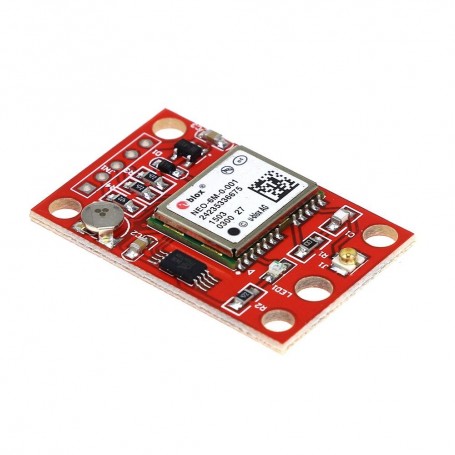
  • Module with antenna, mini size with strong signal.
  • EEPROM save the configuration parameter data when power down.
    With data backup.
    With LED signal lights.
  • Compatible with various flight control modules.
  • Power supply: 3V-5V
  • Models: GY – GPS6MV2
  • The default baud rate: 9600
  • Module size: Approx. 25 mm x 35 mm / 0.98″ x 1.37″

How to get started with GY-NEO6MV2 GPS Module

The GY-NEO6MV2 GPS module series is a family of stand-alone GPS receivers featuring the high performance u-blox 6 positioning engine. These flexible and cost effective receivers offer numerous connectivity options in a miniature 16 x 12.2 x 2.4 mm package. Their compact architecture and power and memory options make GY-NEO6MV2 modules ideal for battery operated mobile devices with very strict cost and space constraints.The 50-channel u-blox 6 positioning engine boasts a Time-To-First-Fix (TTFF) of under 1 second. The dedicated acquisition engine, with 2 million correlators, is capable of massive parallel time/frequency space searches,enabling it to find satellites instantly. Innovative design and technology suppresses jamming sources and mitigates multi-path effects, giving GY-NEO6MV2 GPS receivers excellent navigation performance even in the most challenging environments.

Specifications

1.Supply Voltage:2.7 to 3.6V

2.Supply current:67 mA

3.Antenna gain:50 dB

4.Operating temperature:-40 to 85°C

5.Antenna Type:Passive and active antenna

6.Interfaces:UART,USB,SPI.

  • Vcc-Supply Voltage
  • Gnd-Ground pin
  • TX and RX-These 2 pins acts as an UART interface for communication.
  • PPS (Pulse Per Second) pin is used to time things very accurately.

How to connect NEO6MV2 GPS Module with Arduino UNO?

Hardware and Software Required:

  • NEO6MV2 GPS Module
  • Arduino UNO
  • Arduino IDE(1.0.6V)
  • 10kΩ resistor
  • 4.7kΩ resistor
  • Wires

That means, you simple connect the 5V Power/VCC and Ground of your Arduino directly to the receiver. The same goes for the TX (green) wire, which gets conected to digital port 3 of your Arduino. For the RX wire, a small voltage divider is set in place, using a 4.7kOhm (with pink stripe) and a 10kOhm resistor (black/orange stripes). That means for the RX wire, a wire from digital port 4 to the 4.7k resistor, then to the 10k, which is tied to Ground. Where the two resistors are connected, we get the voltage from to the RX port of the GPS module.

Installing a library: TinyGPS

On Arduino, the reference and most advanced GPS lib is Mikal Hart’s TinyGPS. Head over to GitHub and download the latest release first.Download the TinyGPS library here. Once complete, unzip the content into your “libraries” subfolder of your Arduino IDE installation and restart the IDE itself. You should now have a new set of “Examples” under File/Examples/TinyGPS.

Open the “test_with_gps_device.ino” from the examples folder. This module uses baudrate 9600, so in the setup() method find the code “ss.begin(4800);” and replace it with ss.begin(9600);. Now upload the code and open the serial monitor. If the module fails to get a fix, try to use it near a window or outdoors. The fix could take several minutes.“test_with_gps_device.ino” has all the information you need. You will need to set a correct baud rate to 115200 and you are ready to go!
As you can see on my serial monitor I have got the latitude and longitude coordinates. if you get those stars at the beginning all over your serial monitor, wait the module until it is connected to the satellites. That’s all, have fun !!!
Resources:
Arduino library:
Arduino sketch:
امتیاز شما

  • Mahdi hemmatzade | 5ماه قبل
    زمان تقریبی موجودی برای این کالای پرکاربرد مشخص نیست ایا ؟
    پاسخ | گزارش
    0 thumb_down
    0 thumb_up
  • امیر داودآبادی | بیش از 3 سال قبل
    سلام.خسته نباشید.
    جناب با این ماژول فقط میشه مختصات خود ماژول رو در جایی که هست پیدا کرد و مثلا نمیتوان به عنوان ردیاب استفاده نمود؟ممکنه راهنمایی فرمایید برای ردیابی از چه ماژول و چگونه باید استفاده نمود
    پاسخ | گزارش
    0 thumb_down
    0 thumb_up
    • پشتیبانی فروشگاه | بیش از 3 سال قبل
      سلام، این قطعه مختصات مکانی را می تواند مشخص کند و برای ردیابی باید یک مدار طراحی کنید که دارای میکروکنترلر و قطعات لازم باشد.
      پاسخ | گزارش
      0 thumb_down
      0 thumb_up
  • Ali Tondar | بیش از 3 سال قبل
    لطفا انتن مورد نیاز رو هم راه نمایی بفرمایید
    پاسخ | گزارش
    0 thumb_down
    0 thumb_up
    • پشتیبانی فروشگاه | بیش از 3 سال قبل
      سلام،
      آنتن GPS داخلی اکتیو سایز 12x12mm مدل GPSH169N
      ( کد کالا : 2051001044 ) لینک خرید: http://eshop.eca.ir/p/2051001044
      پاسخ | گزارش
      0 thumb_down
      0 thumb_up
  • Ali Tondar | بیش از 3 سال قبل
    سلام ببخشید فقط مدار هس یا ماژول هم همراهش هس؟
    پاسخ | گزارش
    0 thumb_down
    0 thumb_up
    • پشتیبانی فروشگاه | بیش از 3 سال قبل
      سلام، بله به همراه ماژول می باشد
      پاسخ | گزارش
      0 thumb_down
      0 thumb_up
  • حسین نهاوندی | بیش از 3 سال قبل
    سلام،لطفا انتن موردنظر این برد رو بزارید
    پاسخ | گزارش
    0 thumb_down
    0 thumb_up
  • دانیال H | بیش از 3 سال قبل
    با سلام آیا میشه این ماژول رو با رزبری پای راه اندازی کرد؟
    پاسخ | گزارش
    0 thumb_down
    0 thumb_up
    • پشتیبانی فروشگاه | بیش از 3 سال قبل
      قابلیت راه اندازی با برد رزبری پای را دارد.
      پاسخ | گزارش
      0 thumb_down
      0 thumb_up
  • Ehsan Behrooz | بیش از 3 سال قبل
    باسلام
    این ماژول حتما باید با آنتن استفاده شود؟ یا بدون آنتن هم کار می کند؟
    پاسخ | گزارش
    0 thumb_down
    0 thumb_up
    • پشتیبانی فروشگاه | بیش از 3 سال قبل
      سلام، حتما می بایست با آنتن استفاده شود
      پاسخ | گزارش
      0 thumb_down
      0 thumb_up
  • amin ebrahimian | بیش از 3 سال قبل
    سلام
    ولتاژ این ماژول چنده یه جا نوشته شده 2 تا 3.7 یه جا نوشته 3 تا 5؟؟؟
    پاسخ | گزارش
    0 thumb_down
    0 thumb_up
    • پشتیبانی فروشگاه | بیش از 3 سال قبل
      سلام، ولتاژ کاری برد راه انداز 3 تا 5 ولت بوده و ولتاژ کاری ماژول GPS به کار رفته در برد 2.7 تا 3.6 می باشد. برای راه اندازی این برد از محدوده ولتاژ 3 تا 5 استفاده نمایید.
      پاسخ | گزارش
      0 thumb_down
      0 thumb_up
  • Sahand ahamdi | بیش از 3 سال قبل
    سلام و عرض ادب خدمت شرکت eca من یدونه از این ماژول neo 6m تهیه کرده بودم ولی از وقتی که دستم رسیده اصلا مختصات را کامل نمیده حتی تو اینترنت نگاهی کردم نوشته بود تو محیط بسته تست کنید من تو این شرایطم تست کردم ولی باز مختصات نمیده و وقتی می برم محیط باز یدونه چراغ ابی رنگ چشمک میزنه ولی تو محیط بسته نه لطفا راهنمایی کنید این ماژول خیلی واسم ضروریه
    تو serial monitor arduino
    $GPRMC رو اینجوری میده کامل نمیده
    GPRMC,103104,00,V,,,,,,,N*7A
    پاسخ | گزارش
    0 thumb_down
    0 thumb_up
    • پشتیبانی فروشگاه | بیش از 3 سال قبل
      سلام، ارور مورد نظر به عوامل مختلفی مثل کد نوشته شده و شرایط راه اندازی بستگی دارد. از آنتن مناسب برای ماژول استفاده نمایید. برای دریافت پاسخ سریع و جامع در مورد سوالات علمی و فنی خواهشمند است به انجمن های تخصصی برق و الکترونیک ECA مراجعه فرمایید. (www.eca.ir/forums)
      پاسخ | گزارش
      0 thumb_down
      0 thumb_up
  • مسعود حیدری | بیش از 4 سال قبل
    میبخشید خود این برد رو فقط طراحی pcd رو ندارید؟
    و یا خود برد به تنهایی؟
    پاسخ | گزارش
    0 thumb_down
    0 thumb_up
    • پشتیبانی فروشگاه | بیش از 4 سال قبل
      سلام، نه متاسفانه نداریم
      پاسخ | گزارش
      0 thumb_down
      0 thumb_up
ویرایش نظر
  یا لغو