پرطرفدار

برد آردوینو Arduino UNO R3
8,550,000
ریال


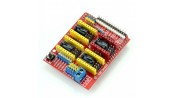
شیلد توسعه CNC سازگار با Arduino UNO با پشتیبانی از 4 محور و درایورهای A4988 و DRV8825، مناسب راهاندازی استپرموتورهای دوقطبی در بازه 12 تا 36V
شیلد CNC ورژن 3 یک برد توسعه کاربردی برای Arduino UNO است که به منظور کنترل ماشینهای CNC، لیزر، پرینتر سهبعدی و سیستمهای حرکتی چندمحوره طراحی شده است. این شیلد بهصورت مستقیم روی برد آردوینو نصب میشود و با فریمور متنباز GRBL 0.8c سازگار است، بهگونهای که دستورات G-code را به سیگنالهای STEP و DIR برای استپرموتورها تبدیل میکند. برد از 4 محور X، Y، Z و A پشتیبانی میکند که محور A میتواند بهصورت مستقل یا بهعنوان محور تکرارشونده یکی از محورهای اصلی استفاده شود. این شیلد از ماژولهای درایور استپر نوع Pololu مانند A4988 و DRV8825 پشتیبانی میکند و امکان تنظیم میکرواستپ از طریق جامپرهای روی برد فراهم شده است. وجود ورودیهای End Stop برای هر محور، خروجی کنترل اسپیندل، فعالسازی کولانت و ترمینال تغذیه 12 تا 36V DC آن را به یک گزینه مناسب برای پروژههای نیمهصنعتی و آموزشی تبدیل کرده است. طراحی فشرده، کانکتورهای 4 پین برای اتصال مستقیم استپرموتور و قابلیت توسعه آسان از ویژگیهای مهم این شیلد محسوب میشوند.
مشخصات
کاربردهای رایج
این شیلد امکان کنترل دقیق حرکتی در پروژههای مبتنی بر G-code را فراهم میکند و برای کاربرانی که قصد ساخت یا ارتقاء سیستمهای CNC رومیزی دارند یک راهکار اقتصادی و منعطف محسوب میشود. پشتیبانی از درایورهای متداول بازار باعث دسترسی آسان به قطعات یدکی و تنظیم جریان و میکرواستپ متناسب با نیاز پروژه میشود.
Specifications


الان من چجوری از محور a استفاده کنم؟ چ ب صورت مشترک چ مجزا
آیا این شیلد نیاز به جامپر خاصی دارد ؟
سلام بله شیلد CNC ورژن 3 برای تنظیمات صحیح نیاز به قرار دادن جامپرها دارد. سه جامپر در زیر هر درایور A4988 یا DRV8825 قرار میگیرد که تعیینکننده مد میکرواستپینگ هستند و بسته به ترکیب آنها میتوانید حالتهای Full Step، Half Step، 1/4، 1/8 یا 1/16 استپ را انتخاب کنید. همچنین جامپرهایی برای فعالکردن محور Z دوگانه یا انتخاب Endstop ها وجود دارد. بدون تنظیم صحیح جامپرها، درایورها یا در حالت پیشفرض کار میکنند یا عملکرد دلخواه حاصل نخواهد شد. برای دریافت پاسخ سریع و جامع در مورد سوالات علمی و فنی خواهشمند است به انجمن های تخصصی برق و الکترونیک ECA مراجعه فرمایید. (https://forum.eca.ir)
از کدوم کانکتور برای اتصال سیم موتور براشلس به شیلد استفاده کنم؟
سلام به نسبت کانکتور سیم خود می بایست انتخاب کنید مادگی های موجود بر روی این ماژول استاندارد خاصی ندارد و صرفا پین هدر مادگی هستند .
