

ماژول شارژر وایرلس 5W مدل HW-225 به همراه صفحه کویل شارژ
2,150,000 ریال
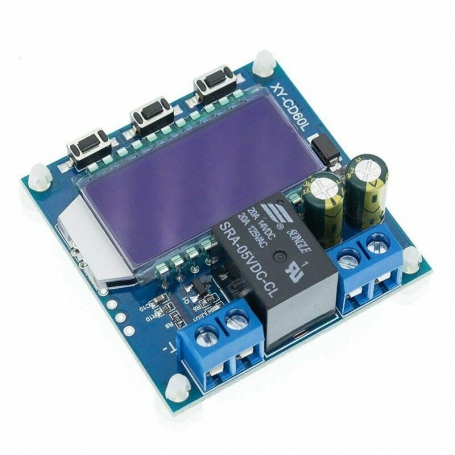


ماژول کنترل شارژ باتری های 6 تا 60 ولت لیتیومی و اسیدی به همراه نمایشگر LCD مونوکروم و کلیدهای کنترلی
از آنجایی که بهرهگیری از باتریهای لیتیومی روز به روز گستردهتر میشود، بهرهگیری از انواع ماژول محافظ شارژ و کنترل شارژ نیز توسعه پیدا کرده است. در تعمیرات تجهیزات الکترونیکی و شارژرهای دستگاهها و یا ساخت پروژههایی که نیاز به چنین مداراتی دارند نیز از این گروه از ماژولهای الکترونیکی استفاده میشود. ماژولهای شارژر این قابلیت را دارند که کاربر مشخص کند هنگامی که به ولتاژ موردنظر رسید، شارژ باتری قطع شود. در این ماژول کلید ستینگ ورودی و خروجی و دکمههای دیگر پایین و بالا را تنظیم میکند.
مشخصات
ابزار تست چندمنظوره
حالت کاری دوگانه
پشتیبانی از حفاظت شارژ
پشتیبانی از حفاظت تخلیه
پشتیبانی از تنظیم زمان شارژ/تخلیه
تشخیص خودکار پارامترها
نمایشگر LCD با وضوح بالا
نمایش چندین پارامتر
پشتیبانی از حالت صرفهجویی در مصرف انرژی
پشتیبانی از تشخیص خودکار باتری
کاربرد
این ماژول از دو حالت کاری پشتیبانی میکند: کنترل شارژ (IN) و کنترل تخلیه (OUT).
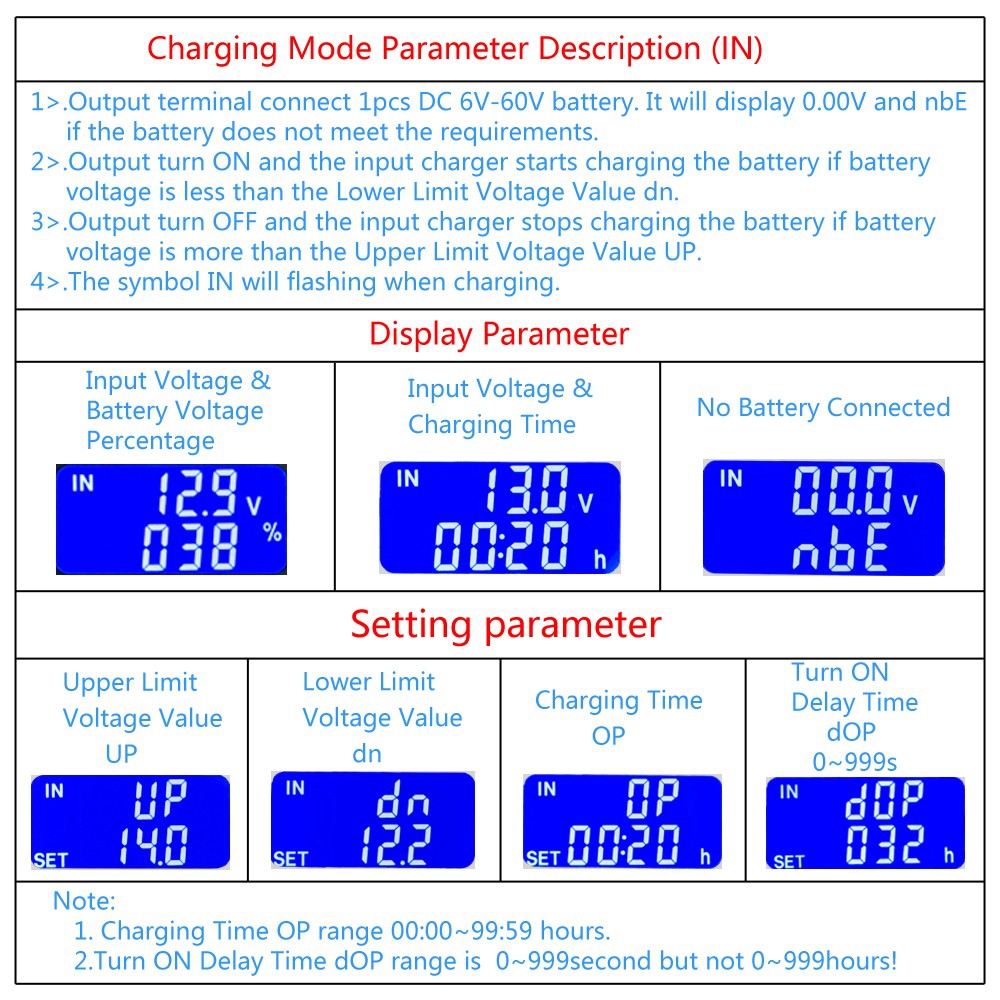
کنترل شارژ (IN): این حالت برای کنترل شارژ استفاده میشود تا از شارژ بیش از حد جلوگیری شود. نماد IN در نمایشگر نشاندهنده حالت شارژ است.
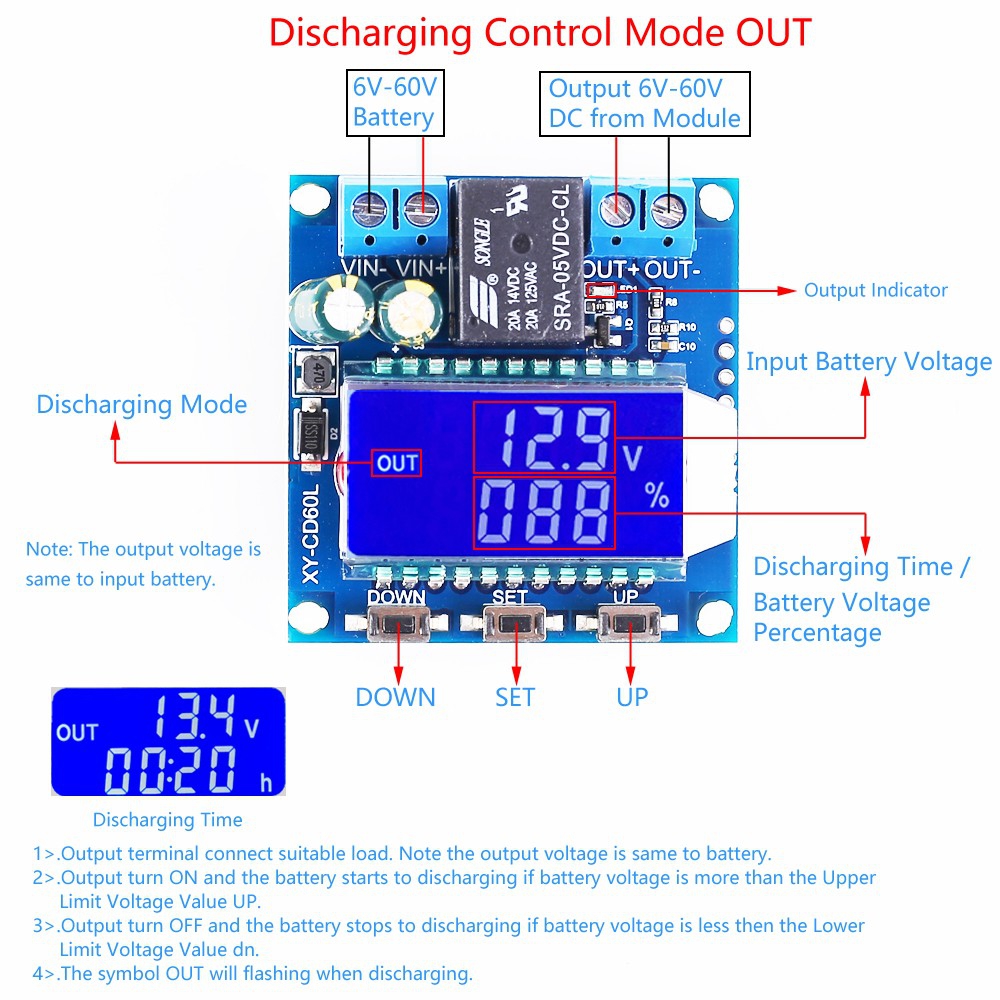
کنترل تخلیه (OUT): این حالت برای کنترل تخلیه باتری به کار میرود تا از تخلیه بیش از حد و کاهش عمر باتری جلوگیری کند. نماد OUT در نمایشگر نشاندهنده حالت تخلیه است.
درصد ولتاژ باتری: این مقدار از ولتاژ باتری V، مقدار حد پایین ولتاژ dn و مقدار حد بالای ولتاژ UP به دست میآید. فرمول محاسبه: V/(UP-dn).
بررسی خودکار پارامترها: اگر مقدار ولتاژ حد پایین dn بیشتر از مقدار ولتاژ حد بالای UP باشد، صفحه نمایش ERR را نشان داده و چشمک میزند.
Description
XY-CD60L is a battery charge and discharge controller module. It can be used for DC 6V~60V any one lithium/lead-acid battery.
Features
1>.Multi-function test instrument
2>.Dual mode work
3>.Support charging protection
4>.Support discharge protection
5>.Support set the charging/discharging time
6>.Automatic detection parameters
7>.HD LCD display
8>.Multi-parameter display
9>.Support power saving mode
10>.Supports automatic battery detection
Function
1>.Module supports 2 working modes: Charging Control IN and Discharging Control OUT.
2>.Charging Control IN: This mode is used for charging control to prevent overcharging. Display symbol IN indicates charging mode.
3>.Discharging Control OUT: This mode is used for battery discharge control to prevent battery over-discharge and delay battery life. Display symbol OUT indicates discharging mode.
4>.Battery voltage percentage: It is value get from battery voltage V, Lower Limit Voltage Value dn and Upper Limit Voltage Value UP. Calculation formula: V/(UP-dn).
5>.Automatic parameter check: Screen will display and flashing ERR if the Lower Limit Voltage Value dn is more than the Upper Limit Voltage Value UP.


من برای شارژ باتری ۷ امپری اینو گرفتم ، ورودی رو ۱۹ ولت ۸۰۰ میلی امپر وصل کردم ، ولتاژ اپ رو روی ۱۳ و ولتاژ داون رو روی ۱۲ قرار دادم که اگه رسید ۱۲ شارژ کنه و رسید ۱۳ قطع کنه ، ولی تا باتری و وصل میکنم ۱ ثانیه بعد قطع میشه و این لوپ هی تکرار میشه و داعما در حال قطع و وصل شدنه ، لطفا راهنماییم کنید ، ممنونم
برای دریافت پاسخ سریع و جامع در مورد سوالات علمی و فنی خواهشمند است به انجمن های تخصصی برق و الکترونیک ECA مراجعه فرمایید. (www.eca.ir/forums)
سلام در مورد آمپر خروجی یا وات توضیحی ندادید. ممنون
سلام جریان شارژ 10-15 درصد ظرفیت باتری است. برای مثال، اگر ظرفیت باتری 20AH باشد، جریان شارژ 2-3A است.
سلام برای شارژ باتری خودرو 12 ولت 70 آمپر چه منبع تغذیه ای رو پیشنهاد میدهید؟
برای دریافت پاسخ سریع و جامع در مورد سوالات علمی و فنی خواهشمند است به انجمن های تخصصی برق و الکترونیک ECA مراجعه فرمایید. (www.eca.ir/forums)
سلام آیا با این دستگاه میشود باتری موتور ۱۲ ولت ۷ آمپر را با استفاده از آداپتور ۱۰ الی ۱۵ ولت ۱۰ آمپر شارژ کرد ؟ اگه میشود آداپتور را روی چه ولتاژی تنظیم کنیم ؟
برای دریافت پاسخ سریع و جامع در مورد سوالات علمی و فنی خواهشمند است به انجمن های تخصصی برق و الکترونیک ECA مراجعه فرمایید. (www.eca.ir/forums)


